[BI] BAM to FASTQ using nf-core pipeline
If you’ve ever downloaded public NGS data from databases like TCGA or ICDC (previous post), you know that these usually come in a “bam” format. While bam is great, sometimes you need to flex your bioinformatic muscles and run these datasets through a custom pipeline. This usually means converting BAM to the FASTQ format. Today, I’ll introduce this transformation process using the incredible nf-core pipeline powered by Nextflow.
Nextflow and nf-core
Nextflow Nature methods
- Snapshot: Your one-stop-shop for designing and deploying data-driven computational workflows.
- Pros: Highly flexible, ensures reproducibility, offers intuitive scripting, scales efficiently, has robust error-handling, and seamlessly integrates with Git and GitHub.
nf-core Nature Biotechnology
- Snapshot: The bioinformatics community—bringing you top-tier, peer-reviewed analysis pipelines crafted in Nextflow.
- Learn More? Here’s a tutorial to get you started!
Pipeline summary
Alright, let’s get down to the nitty-gritty. Here’s a step-by-step summary of the nf-core/bamtofastq pipeline:
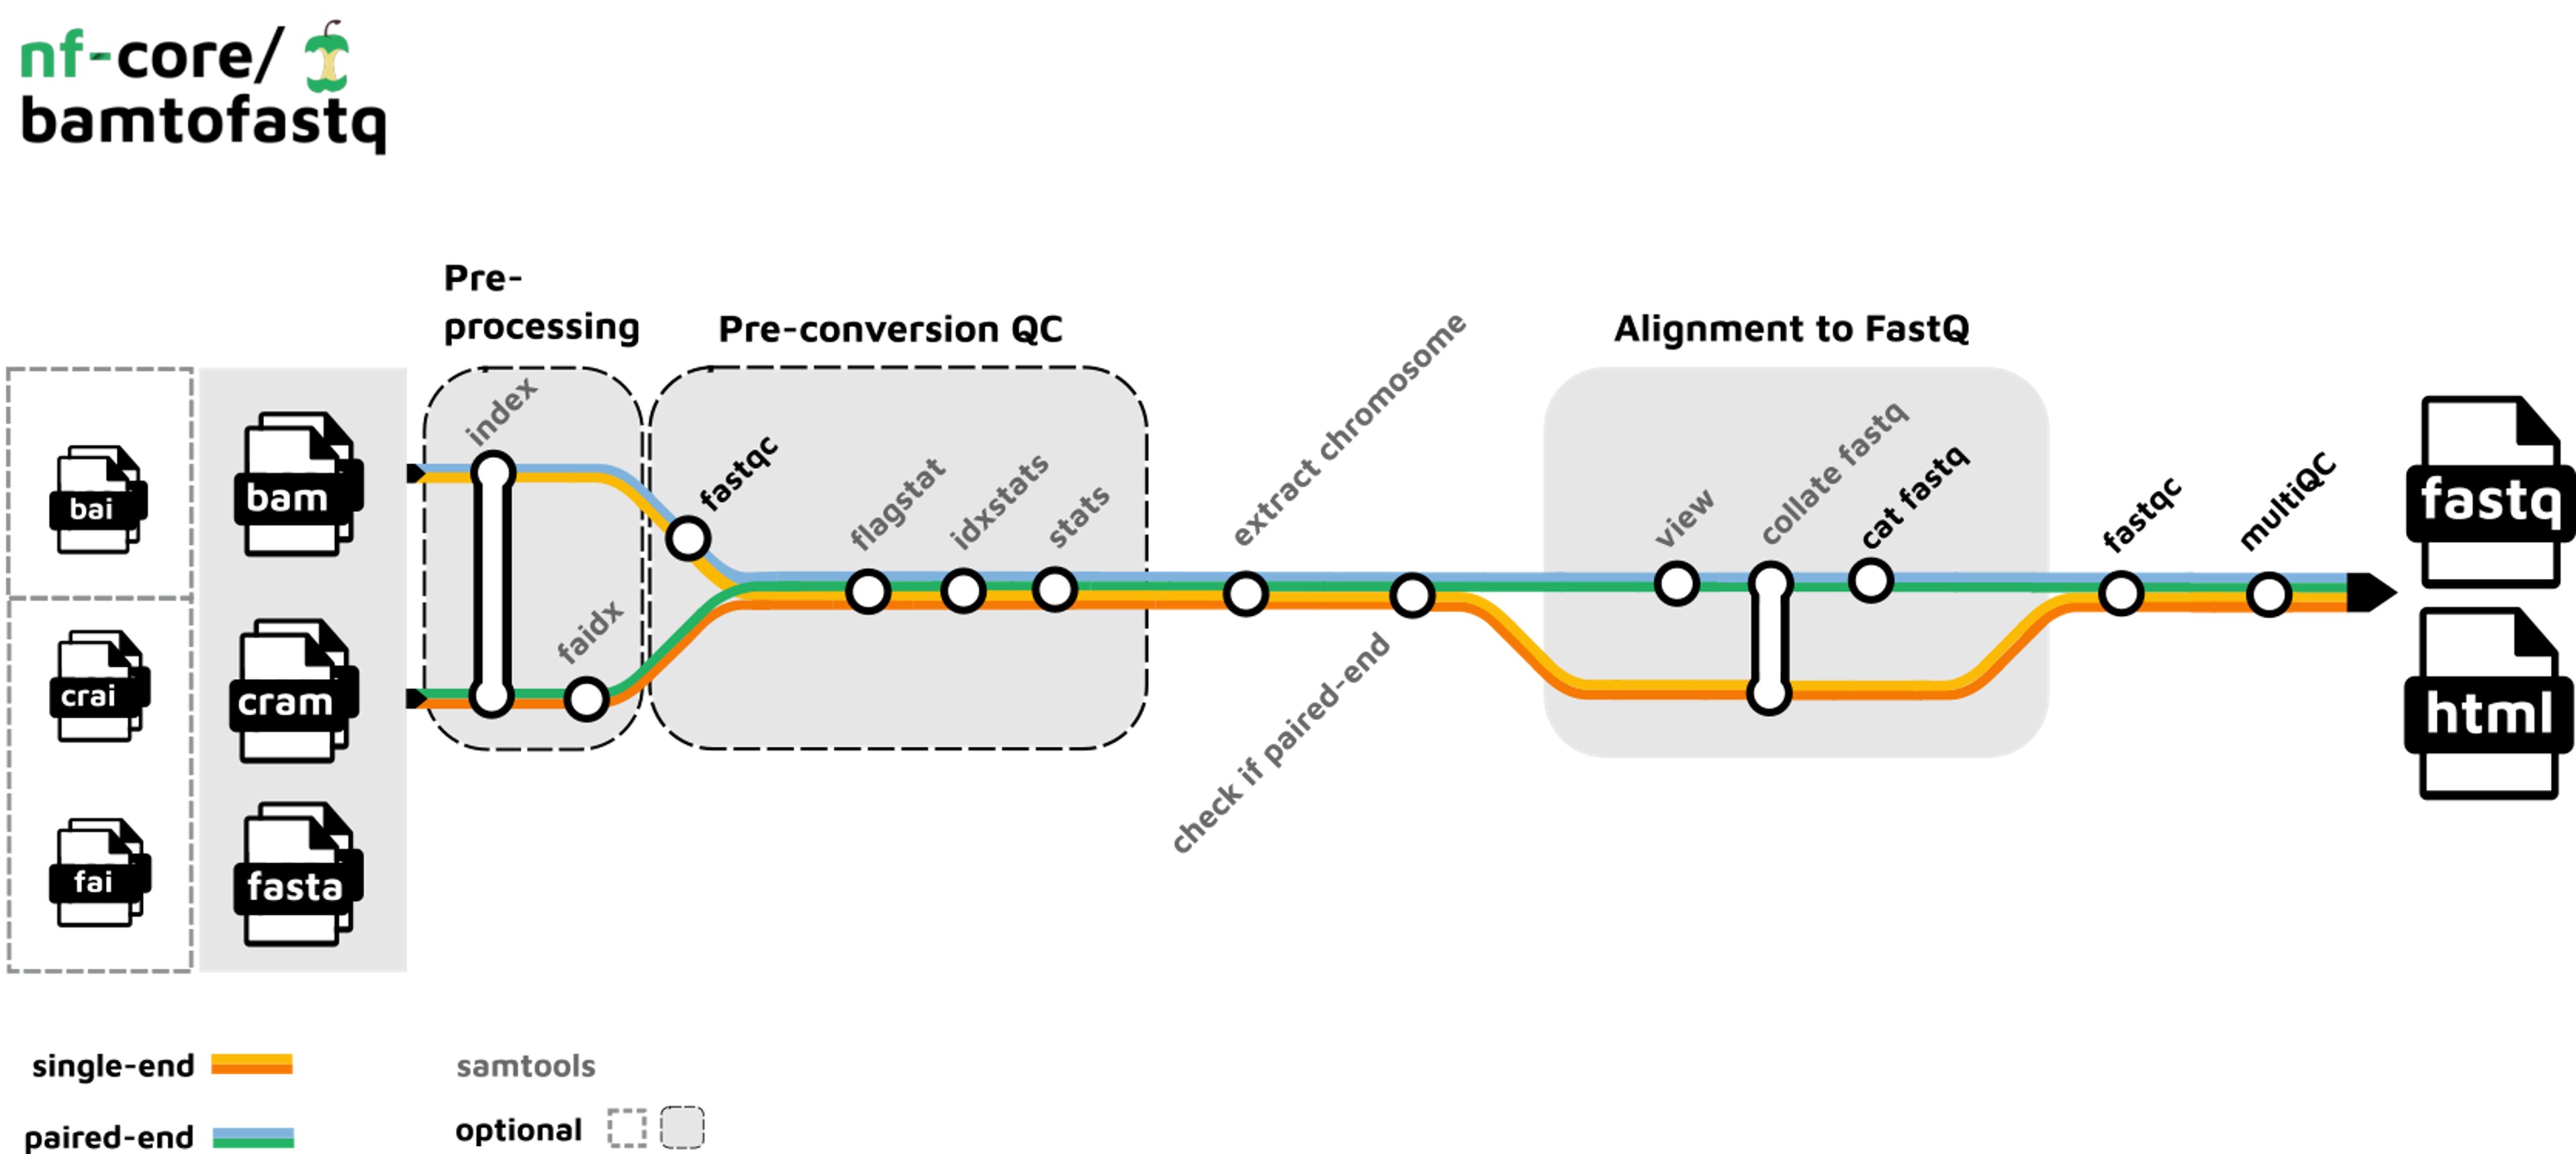
2. Check if input files are single- or paired-end (Samtools).
3. Compute statistics on input files (Samtools).
4. Convert to fastq reads (Samtools).
5. QC of converted fastq reads (FastQC).
6. Summarize QC and statistics before and after format conversion (MultiQC).
How to Convert BAM to FASTQ?
For the uninitiated, transitioning from BAM to FASTQ might sound like a daunting task. Fret not! Here’s a detailed guide using the nf-core pipeline.
-
Setting Up the Environment Before the conversion, you’ll need to set up your bioinformatics environment. Let’s begin with installing Nextflow using the conda environment
a. Configure Conda Channels First, I’ll assume you’re using the conda environment. Run these commands to add the necessary channels:
conda config --add channels defaults
conda config --add channels bioconda
conda config --add channels conda-forge
b. Create and Activate the Conda Environment Now, let’s create a new conda environment and activate it:
conda create --name env_nf nextflow conda activate env_nf -
Install Singularity Singularity is the container of choice for this pipeline. A quick heads up - the Singularity version can significantly influence the success of your pipeline execution.
a. Choose the Right Version My tests showed that the version of Singularity is crucial. For me, the most downloaded version in conda-forge/singularity/files was error-free.
b. Install Singularity Here’s how I did it with version singularity-3.8.6:
# version 3.8.6 wget https://anaconda.org/conda-forge/singularity/3.8.6/download/linux-64/singularity-3.8.6-h9c2343c_0.tar.bz2 conda install singularity-3.8.6-h9c2343c_0.tar.bz2 -
Preparing Your Input
Before you can run the pipeline, you’ll need an input file. Here’s how you can generate one:
# Ensure you're in the directory containing your bam files
echo "sample_id,mapped,index,file_type" > samplesheet.csv
for bam in *.bam;do pre=${bam%.bam}
    echo "${pre},${bam},,bam" >> samplesheet.csv
done
Your input file will resemble the format shown in this
sample_id,mapped,index,file_type 010015_0103,010015_0103.bam,,bam 010031_0103,010031_0103.bam,,bam 010031_0200,010031_0200.bam,,bam 010045_0103,010045_0103.bam,,bam 010072_0103,010072_0103.bam,,bam 010091_0103,010091_0103.bam,,bam -
Run the pipeline!!
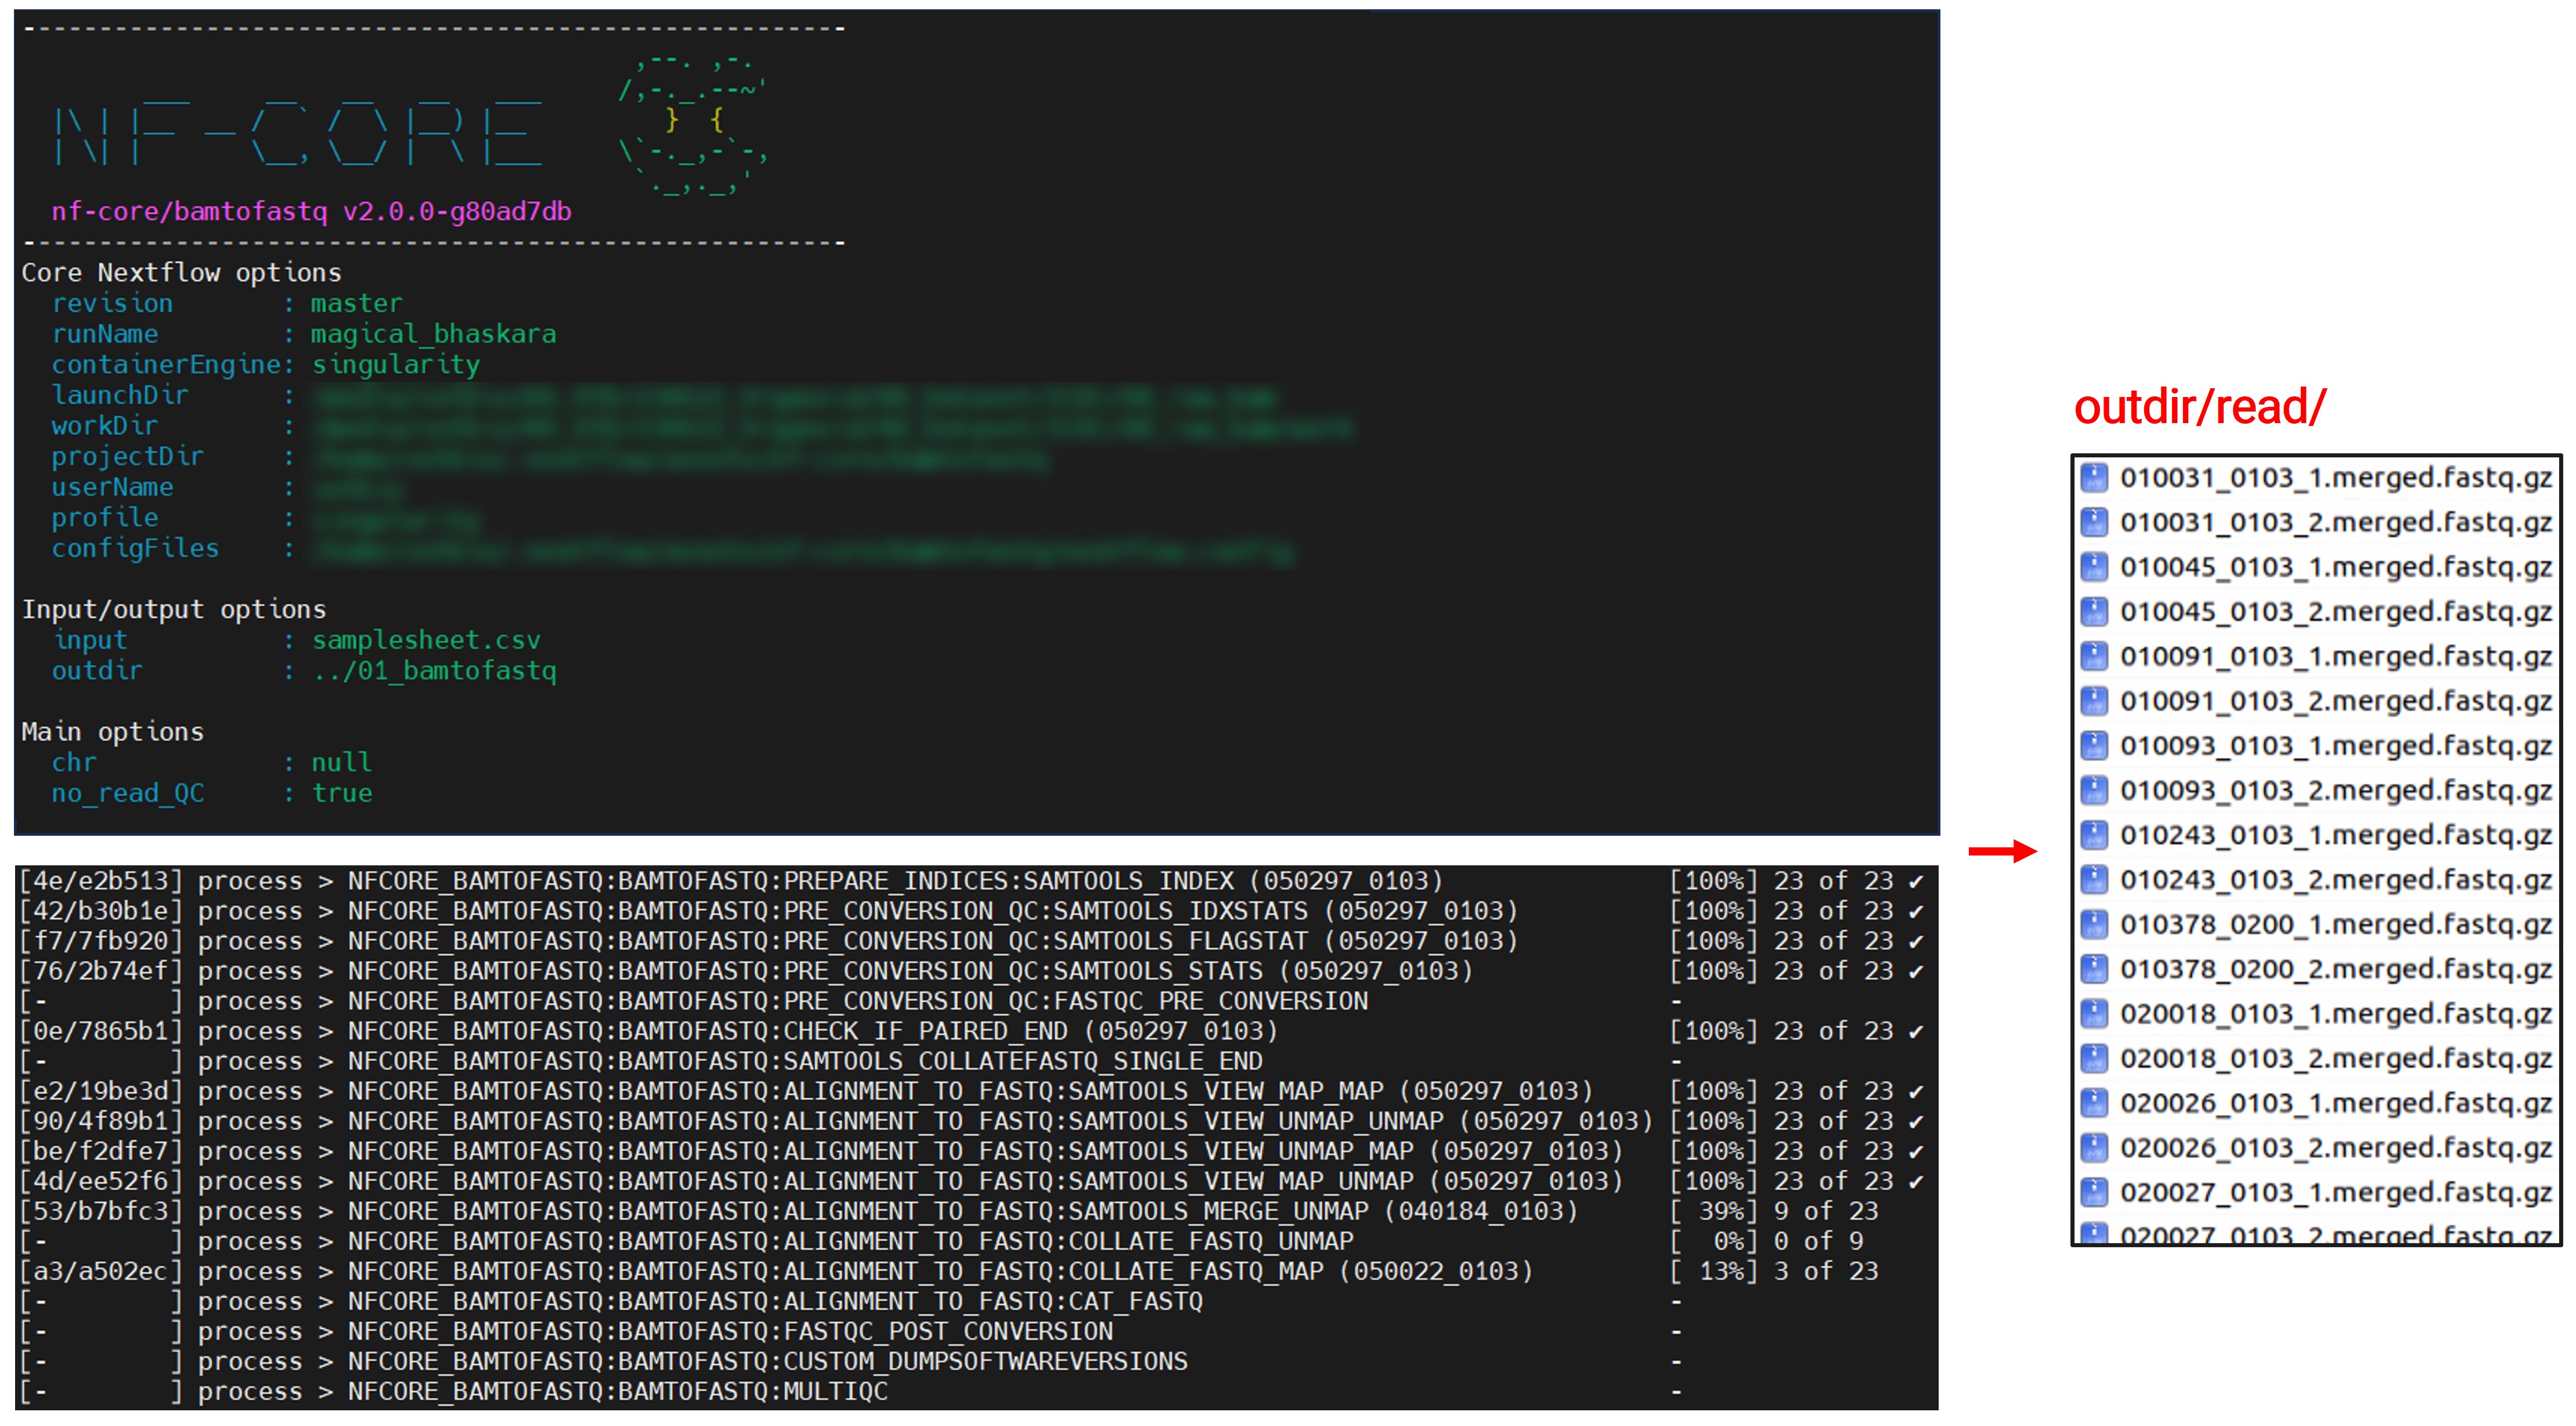
Finally, it’s time to run the pipeline:
nextflow run nf-core/bamtofastq \
    -profile singularity \
    --input samplesheet.csv \
    --outdir ../01_bamtofastq \
    --no_read_QC
I encountered an issue with the singularity image pull for FastQC. So, I bypassed this step using the –no_read_QC option.
As the pipeline runs, you’ll see key information and progress updates. Depending on your sample’s size and count, the process might take a few hours. But, in the end, your much-awaited FASTQ files will be ready!
Details of the Conversion Steps
2. Check if input files are single- or paired-end (Samtools).
Here’s a simple way to check using samtools:
-
View the first few reads in the file:
samtools view your_file.bam | head -
Inspect the flags: The second column in the output represents the bitwise flag for each read. If the read is paired-end, the flag will contain the value
1in its bitwise representation. However, to programmatically determine if a file is primarily single-end or paired-end, you can use the following approach:samtools view your_file.bam | \ awk '{if(and($2,1)) print "paired-end"; else print "single-end";}' | \ sort | uniq -cThis command will give you a count of single-end vs. paired-end reads. If the vast majority of reads are one type, that defines the sequencing type for the dataset. Note that in rare cases, there may be a mix, but typically a sequencing run will produce one type or the other.
Keep in mind, however, that this method only checks a small subset of reads. For a more definitive assessment, a larger subset or even the entire file may need to be checked.
4. Convert to fastq reads (Samtools).
-
samtools collate:
samtools collateis used to reorder reads in a BAM file such that paired-end reads are adjacent. This is especially useful when you need to process the BAM file in a way that requires the pairs to be together, such as converting to FASTQ.samtools collate input.bam output.prefixThis will generate a BAM file named
output.prefix.bamin which paired-end reads are adjacent. -
samtools fastq: Once you have your BAM file with paired-end reads adjacent (either from
samtools collateor if you are certain they are already ordered), you can then usesamtools fastqto convert it to FASTQ format.Usage for single-end reads:
samtools fastq input.bam > output.fastqUsage for paired-end reads:
samtools fastq -1 output_1.fastq -2 output_2.fastq input.bamHere,
-1specifies the output file for the first read of each pair, and-2specifies the output file for the second read.In conclusion,
samtools collateis useful for reordering paired-end reads in a BAM file, andsamtools fastqis used for the actual conversion of BAM to FASTQ. Always ensure your reads are properly ordered before trying to convert to FASTQ, especially for paired-end data.


Leave a comment